 Pin it
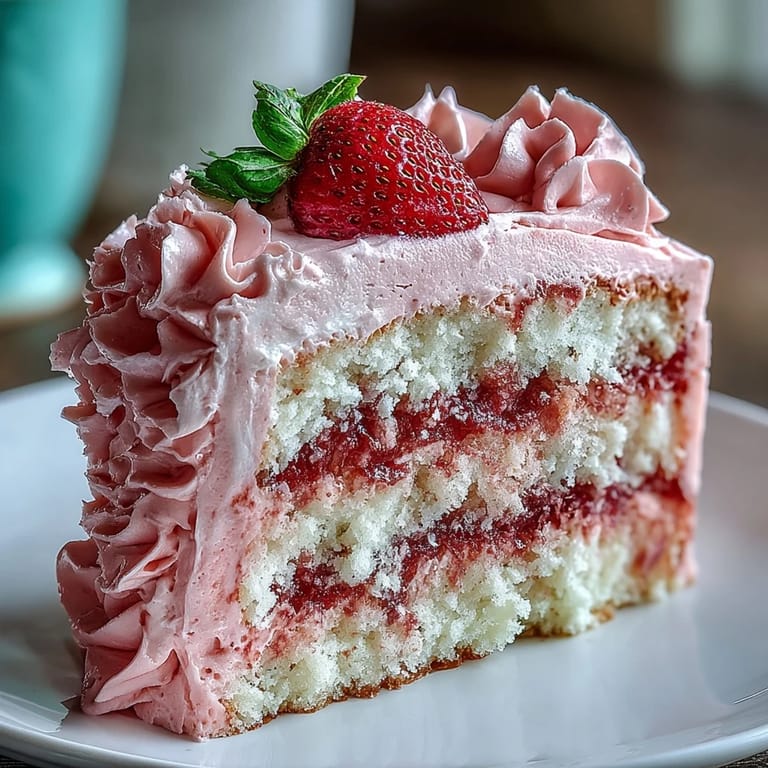
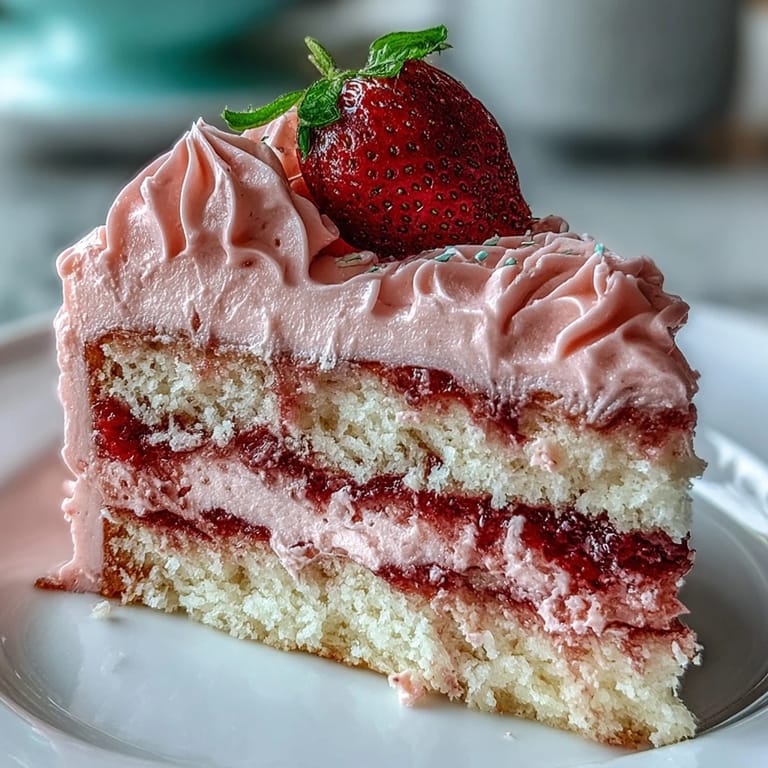
 My friend texted me a photo of a pink ombre cake at a Valentine's Day brunch, and I spent the next hour convinced I couldn't possibly make something that beautiful. Then I realized it was just vanilla cake and strawberry buttercream with a little food coloring magic—something I'd been overthinking for no reason. That's when this cake became my go-to for celebrating love, friendship, or honestly just a Tuesday when things need to feel festive. The vanilla is soft and forgiving, the strawberry buttercream tastes like summer, and the ombre effect stops people mid-conversation. Once you nail this one, you'll find yourself making it again and again.
I made this cake for a Valentine's Day potluck at work, and three people asked for the recipe before they even finished eating. One colleague who's usually quiet about desserts came into my office the next day and said it was the most beautiful thing she'd ever had on a plate. I realized then that cakes like this do more than satisfy a sweet craving—they make moments feel special and intentional. That's worth the extra effort of the ombre frosting.
Ingredients
- All-purpose flour (2 1/2 cups): The foundation of a tender crumb; measure by spooning into a cup and leveling off rather than scooping directly from the bag, which compacts the flour.
- Baking powder (2 1/2 tsp): Ensures even rise and that feathery lightness throughout; check your container's date because old baking powder won't give you the lift you need.
- Fine salt (1/2 tsp): Balances sweetness and amplifies vanilla flavor more than you'd expect.
- Unsalted butter (1 cup plus 1 cup for frosting): Room temperature is non-negotiable; cold butter won't incorporate air and warm butter makes greasy, flat cakes.
- Granulated sugar (2 cups): Whip this with butter until visibly pale and thick, which takes about three minutes and means you're beating in enough air for a fluffy crumb.
- Large eggs (4): Also at room temperature so they emulsify properly with the butter and sugar; cold eggs cause lumps and dense layers.
- Pure vanilla extract (1 tbsp plus 1 tsp): The soul of this cake; don't skip this or substitute imitation extract if you can help it.
- Whole milk (1 cup): Room temperature keeps everything from seizing up during mixing; alternate adding this with flour so the batter stays emulsified.
- Freeze-dried strawberries (1/2 cup, finely ground): This is the secret weapon for strawberry flavor without wet frosting; pulse them in a food processor until they're powder-fine.
- Powdered sugar (4 cups, sifted): Sift it even if it feels fussy—lumps in your frosting will never fully dissolve and you'll taste grit.
- Heavy cream or milk (2 tbsp): Adds smoothness to frosting that stiffens too much; start with one tablespoon and add more only if needed.
- Pink gel food coloring: Gel holds better than liquid food coloring and doesn't thin out your frosting the way liquid does.
Tired of Takeout? 🥡
Get 10 meals you can make faster than delivery arrives. Seriously.
One email. No spam. Unsubscribe anytime.
Instructions
- Prep your pans like you mean it:
- Grease three 8-inch round cake pans with butter or cooking spray, then line the bottoms with parchment paper rounds. This double protection means your cakes will come out cleanly every time. Preheat your oven to 350°F while you gather the rest of your ingredients.
- Combine your dry ingredients:
- In a medium bowl, whisk together flour, baking powder, and salt until they're evenly distributed. This seems simple but it's where your baking powder gets distributed so you don't end up with pockets of dense cake.
- Cream butter and sugar into clouds:
- In a large bowl or stand mixer, beat the room-temperature butter and sugar on medium-high speed for about three minutes until the mixture is noticeably pale, fluffy, and has almost doubled in volume. You should be able to draw a line through it with your finger and have it hold. Stop occasionally to scrape down the bowl.
- Introduce your eggs carefully:
- Add eggs one at a time, beating well after each addition until the mixture looks smooth again before adding the next egg. This slow incorporation prevents the batter from breaking and ensures every egg is fully emulsified, which means a tender, even crumb.
- Add vanilla and begin alternating:
- Pour in the vanilla extract and beat for another thirty seconds. Now alternate adding flour mixture and milk to the butter mixture, starting and ending with flour—so that's flour, milk, flour, milk, flour. Mix on low speed just until combined; overmixing develops gluten and makes tough cake.
- Divide and bake:
- Divide the batter evenly among your three prepared pans, then smooth the tops gently with a spatula so they'll bake evenly. Bake for 25 to 30 minutes until a toothpick inserted in the center comes out clean or with just a few moist crumbs clinging to it.
- Cool with patience:
- Let cakes rest in their pans for ten minutes—this prevents them from breaking apart—then turn them out onto wire racks to cool completely. Trying to frost a warm cake is a recipe for melted frosting and sliding layers, so patience here saves heartache later.
- Make your strawberry buttercream:
- In a clean large bowl, beat room-temperature butter until it's light and creamy, about two minutes. Gradually add your sifted powdered sugar a cup at a time, beating after each addition, then fold in the finely ground freeze-dried strawberries, heavy cream, vanilla, and salt.
- Beat until fluffy and perfect:
- Continue beating for another two to three minutes until the frosting is light, fluffy, and spreadable. If it feels too stiff, add another teaspoon of cream; if it's too soft, refrigerate it for ten minutes before piping.
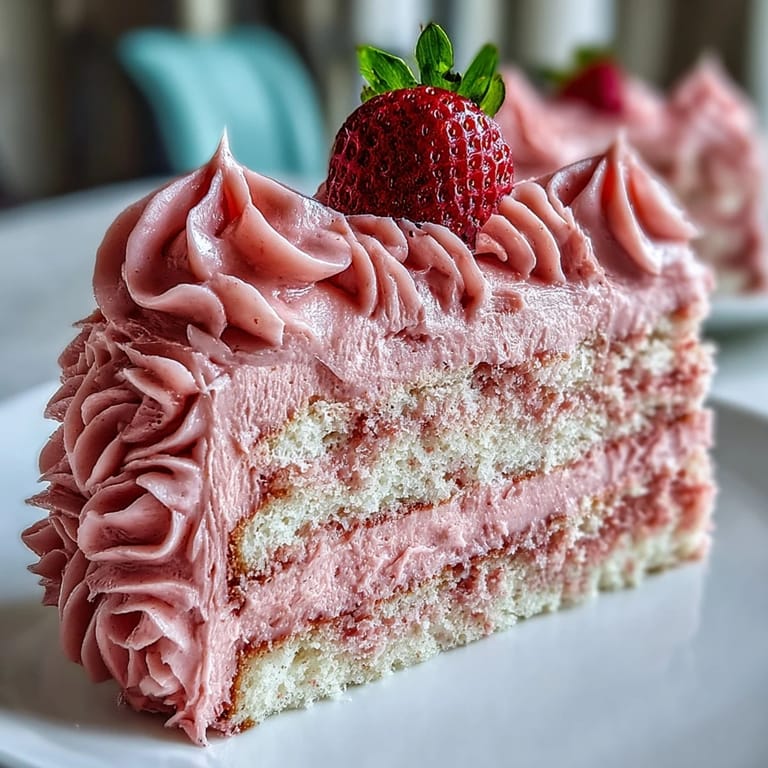
- Create your ombre effect:
- Divide the frosting into three equal bowls. Leave one plain (your lightest layer), tint the second with a few drops of gel food coloring for light pink, and add more coloring to the third for deeper pink. Load each shade into its own piping bag fitted with a round or multi-opening tip.
- Level and layer with intention:
- If your cake layers domed on top, use a serrated knife to level them off so they stack evenly. Place the first layer on your serving plate, pipe or spread a thin layer of the lightest buttercream on top, then repeat with the second layer and medium pink frosting, and the third layer with dark pink frosting.
- Execute the ombre wrap:
- Spread the darkest pink buttercream around the bottom third of the cake, working from the bottom up. Move to medium pink in the middle third, then lightest pink on top. Using an offset spatula or cake scraper, gently blend where the colors meet by dragging the tool upward in soft, overlapping strokes—you're aiming for a gradient, not perfection.
- Finish and chill:
- If you're using fresh strawberries and edible glitter, add them now while the frosting is still slightly soft so they'll stick. Refrigerate the finished cake for at least 30 minutes before slicing; this sets the frosting and ensures those beautiful layers stay intact when you cut.
 Pin it
 A friend's daughter once watched me frost this cake and asked if I'd gone to pastry school. I told her the truth: I'd made it badly twice before I figured out what actually mattered. She seemed surprised that beautiful things sometimes come from small failures and persistent tinkering. That's the real secret—not perfection, but willingness to try again.
Make-Ahead Magic
One of the reasons I keep coming back to this cake is how forgiving the timeline becomes once you understand the freezer. Bake your three cake layers up to four weeks ahead, wrap each one individually in plastic wrap and then foil, and store them flat in the freezer. The day before your celebration, thaw them at room temperature for about two hours, then frost and decorate. This forward-thinking approach means you can focus entirely on the frosting and ombre effect when it matters most, without also managing fresh-baked layers. I've made this cake the morning of an event and it turns out just as beautiful as when I've had days to plan.
Strawberry Flavor Variations
Once you've mastered the basic version, you might find yourself experimenting like I did. A thin layer of strawberry jam between the cake layers deepens the strawberry presence without making anything soggy, since the jam acts as a moisture barrier. Some people swear by adding a quarter cup of fresh strawberry puree to the frosting instead of just the freeze-dried version, but I find this thins things out and makes piping harder—I've learned to let the freeze-dried strawberries do most of the work. The cake itself stays pure vanilla on purpose, which keeps the crumb tender and lets the strawberry frosting be the star.
Ombre Technique Refined
The ombre effect initially intimidated me until I stopped thinking of it as a gradient that had to be perfect and started thinking of it as three intentional color blocks that blur into each other slightly. The key is using a long offset spatula or bench scraper dipped in warm water and dried off—this gives you a clean tool that can drag color upward without scraping away your hard work. Some people rotate the cake on a turntable while they work, which helps, but honestly I just stand on one side and make gentle upward strokes, turning the cake as I go. The closer together you space your three color zones, the more blended the ombre looks; the more space between them, the more dramatic the stripes. There's no wrong answer, just different moods.
- Warm your spatula in hot water and dry it completely before each blending stroke so it glides over frosting instead of dragging.
- If you mess up a section, just spread more frosting over it and try again—buttercream is remarkably forgiving and nobody but you will notice the edit.
- Step back from the cake every few minutes and look at it from across the room to check your ombre balance and catch any spots that need attention.
 Pin it
 This cake has become my answer to 'what should I make for something special,' and I hope it becomes yours too. The beauty is that it's genuinely not as difficult as it looks, and once you make it once, you'll feel confident making it again.
Recipe FAQ
- → How do I achieve the pink ombre effect for the frosting?
Divide the buttercream into three portions, tint each with varying amounts of pink gel food coloring, then layer and smooth from darkest to lightest to create a seamless gradient.
- → Can I prepare the cake layers ahead of time?
Yes, cake layers can be baked in advance and frozen for up to one month to save time on your celebration day.
- → What ingredient provides the strawberry flavor in the buttercream?
Finely ground freeze-dried strawberries are folded into the buttercream for a fresh and intense strawberry flavor without added liquid.
- → How should I store the finished cake?
Keep the cake refrigerated to maintain the buttercream's texture and freshness, especially if not served the same day.
- → Are there optional decorations to enhance the cake's look?
Fresh strawberries and edible glitter or sprinkles can be added on top to elevate presentation for festive occasions.